Edit Consent Information Section |
Purpose |
The Edit Consent Information menu panel option allows users to update existing client consent information in the ImmTrac2 system.
Edit Consent Information Screen
Information Provided |
The Client Search screen displays by clicking the menu panel option for Edit Consent Information. The choice of menu panel option determines what happens after the user searches for a client. From Edit Consent Information, the user will be taken directly to a screen to edit the client's consent information.
Smart Search - This search option uses a complex searching tool to locate an existing client record in the system and requires the user to enter more information fields to conduct the search. The table below describes the Smart Search fields used to conduct a search.
Field Name |
Requirements |
ImmTrac2 ID |
A valid ImmTrac2 ID. Note: If searching for a client with the ImmTrac2 ID, no other fields should be entered. Enter the ImmTrac2 ID. Click Fill, then click Find. |
First Name |
Required. Client's first name. |
Last Name |
Required. Client's last name. |
Middle Name |
Client's middle name. |
Birth Date |
Required. Client's date of birth. Any birth date before today's date and after 01/01/1890 is valid. |
Gender |
Required. Client's gender. |
Mother's First Name |
First name of the client's mother. |
Mother's Maiden Name |
Maiden name of the client's mother. |
Phone |
Client's phone number. |
Street Address |
Required. Client's street address. |
Other Address |
Client's additional street address information, such as apartment #, if applicable. |
PO Box |
Client's PO Box, if applicable. |
Zip |
Client's zip code for address purposes. |
City |
Client's city for address purposes. |
State |
Client's state for address purposes. TX is the default. |
Search Results - After the search process finishes, one of the following three results may occur:
Exact Client Match - The search engine returned only one client. When this occurs, the user is immediately redirected to the View Client screen.. An Exact Client Match will usually occur when the search criteria entered contains information inherently specific to a particular client or client AKA name.
List of Possible Matches - The search engine returned multiple client matches that are displayed in a table. The results are sorted alphabetically by Last Name. Select a client by clicking on the ImmTrac2 ID. The View Client screen displays containing all relevant information for the client.
50 Matches Found - If the number of clients exceeds 50 matches, only the first 50 matches will list and the following message will display: "Please refine your search, only the first 50 matches were returned.” In the event this message is encountered, the scope of the search must be narrowed. Revisit the search criteria and add any more information that is available for the client to try to narrow the results.
Command Button Functionality
Command Button |
Description |
Initiates the client search. |
|
Clears the entered search criteria and search results. |
|
Fills the demographic information for the ImmTrac2 ID entered. |
Edit Consent Information Screen |
After searching and locating the client record, the View Client screen displays. Click the Select Client button to open the Edit Consent Information screen.
Edit Consent Information Screen Details - The client's most recently saved consent information displays, as described in the table below
Field Name |
Description |
Client |
The client's Last, First Name. |
DOB |
The client's date of birth. |
Client Type |
The Client Type is designated by the type of consent on file. (IC = ImmTrac Child; IA = ImmTrac Adult; DC = Disaster Consent, Adult or Child; DU = Disaster Unconsented, Adult or Child; FR = First Responder, Adult; FM = First Responder Family Member, Adult.) |
FR Attribute |
First Responder Attribute. (N = Not a First Responder; F = First Responder, Adult; M = Minor Family Member of a First Responder; A = Adult Family Member of a First Responder.) |
DIR Attribute |
Disaster Information Retention Attribute. (N = DIR consent not granted, Y = DIR consent granted.) |
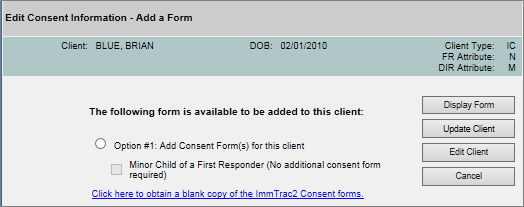
The available consent options that display are determined by which consent forms are already on file and which consent attributes have already been selected for the client.
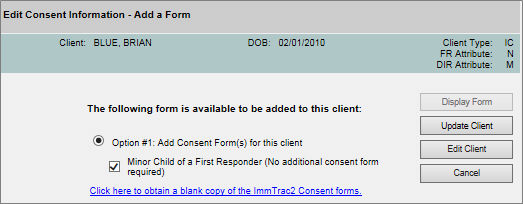
Option #1: Add Consent Form(s) for this client: Select the radio button to activate the subsequent check box(es) under "Option #1."
Once the check box(es) display as active, select the appropriate option to update the client consent information and then click the Update Client button. A pop-up message appears with the following: "Affirm the following consent form is signed as required to update this client's information in ImmTrac2." The specific consent details display in blue text. Click "Affirm" to continue or "Cancel" to return to the Edit Client Consent screen.
NOTE: In this example, because the Minor Child of a First Responder option does not require an additional consent form, the Display Form button is not active.
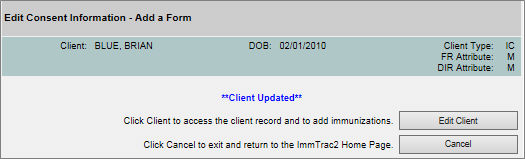
On completion, a "Client Updated" confirmation message displays. The Client Type, FR Attribute, and DIR Attribute display as updated in the top right corner of the screen. In this example the FR Attribute changed from an "N", for "No", to an "M" for "Minor".
Command Button Functionality |
The following table lists the command button functionality on the Edit Consent Information screen.
Button Name |
Description |
|
Opens the selected consent form pre-populated with the client’s information. |
Saves the updated consent information. |
|
|
Navigates to the View Client screen. |
|
Navigates to the View Client screen. |
Note
ImmTrac2 is set up to accommodate a variety of user types. Each user will have access to certain features in the application based on the role that is assigned. Online help reflects the capabilities available to provider user roles. Other user roles should refer to the user manual for more access features and capability details.