Enter New Client Screen |
Purpose |
The Enter New Client menu panel option allows users to enter detailed client information and search the system for existing records before completing a new client entry in ImmTrac2. The screen includes the steps to affirm the client's consent to participate in the registry.
Information Provided |
Smart Search - This search option allows the user to enter detailed information for the client and uses a robust searching tool to find possible matches to existing client records. The user reviews the possible matches to ensure duplicate records are not being entered. The table below describes the Smart Search fields used to enter client information and conduct a search.
Field Name |
Requirements |
ImmTrac2 ID |
A valid ImmTrac2 ID. NOTE: The ImmTrac2 ID field is not applicable when entering new client information. |
First Name |
Required. Client's first name. |
Last Name |
Required. Client's last name. |
Middle Name |
Client's middle name. |
Birth Date |
Required. Client's date of birth. Any birth date before today's date and after 01/01/1890 is valid. |
Gender |
Required. Client's gender. |
Mother's First Name |
First name of the client's mother. |
Mother's Maiden Name |
Maiden name of the client's mother. |
Phone |
Client's phone number. |
Street Address |
Required. Client's street address. |
Other Address |
Client's additional street address information, such as apartment #, if applicable. |
PO Box |
Client's PO Box, if applicable. |
Zip |
Client's zip code for address purposes. |
City |
Client's city for address purposes. |
State |
Client's state for address purposes. TX is the default. |
Command Button Functionality (Smart Search)
Command Button |
Description |
Initiates the client search. |
|
Clears the entered search criteria and search results. |
|
Fills the demographic information for the ImmTrac2 ID entered. |
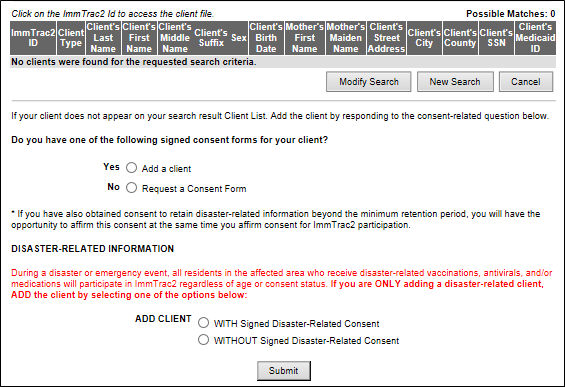
Search Results Table - This table displays when no clients are found or when one or more possible client matches are found. The results table includes a count of how many records were returned for the search criteria entered.
Column |
Description |
ImmTrac2 ID |
Displays the ImmTrac2 ID of the client as a hyperlink. Clicking the number displays the View Client screen. |
Client Type |
The client's consent status. (IC = ImmTrac Child; IA = ImmTrac Adult; DC = Disaster Consented, Adult or Child; DU = Disaster Unconsented, Adult or Child; FR = First Responder, Adult; FM = First Responder Family Member, Adult.) |
Last Name |
The client's last name. |
First Name |
The client's first name. |
Middle Name |
The client's middle name. |
Client's Suffix |
The client's suffix. |
Sex |
The client's gender. |
Client's Birth Date |
The client's birth date in a MM/DD/YYYY format. |
Mother's First Name |
The first name of the client's mother. |
Mother's Maiden Name |
The maiden last name of the client's mother. |
Client's Street Address |
The current street address of the client. |
Client's City |
The client's city for address purposes. |
Client's County |
The client's county. |
Client's SSN |
The client's Social Security number, if available. Only the last four digits are visible to the user. |
Client's Medicaid ID |
The client's Medicaid ID, if available. |
Command Button Functionality (Search Results)
Command Button |
Description |
Returns the user to the Smart Search view and retains all the entered client information. |
|
Returns the user to the Smart Search view and clears all the entered client information. |
|
Navigates to the ImmTrac2 home screen. |
Consent-related Question Section - This section allows the user to affirm that the client has signed the consent forms to participate in the ImmTrac2 registry. Selecting "Yes" navigates to the Add Client Screen. Selecting "No" navigates to the Print Consent Form screen, where consent forms with the client's information pre-populated can be printed.
Command Button Functionality (Consent Question)
Command Button |
Description |
Click submit after selecting "Yes" or "No." If "Yes" is selected, navigates to the Add Client screen. If "No" is selected, navigates to the Print Consent Form screen before proceeding to add the client. |
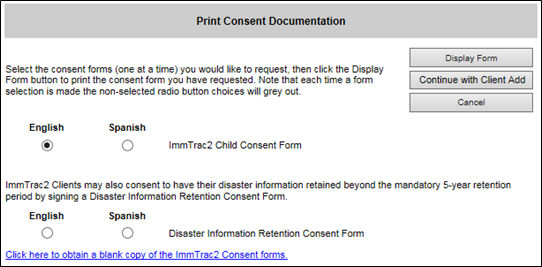
Print Consent Documentation Screen |
The Print Consent Documentation screen allows the user to quickly print consent documentation with the client's information pre-populated, before continuing with the Add Client process. This screen lists the consent options available for the client based on the client's date of birth.
Command Button Functionality
Command Button |
Description |
Opens a new browser tab to display a PDF version of the form. |
|
Navigates to the Add Client screen. |
|
Returns the user to the search results screen. |
Add Client Screen |
The Add Client screen allow user to enter the remaining required client information. In the Personal Information section users must enter any required information that was not already entered in the Search screen. As an example, the Mother's Maiden Last and Mothers First Name. The screen displays with the Address Information demographic tab automatically expanded, and users must complete the required information, such as the county, in order to save the record.
This screen also allows the user to enter additional client demographic details in the client's record. Sections of the screen are referred to as demographic tabs and can be displayed by clicking the black arrow to expand or contract each section.
NOTE: Details in all other demographic tabs are optional. If information is entered in the tabs, then required fields must be populated in order to save the record.
The client demographic tabs are listed below. Click the links to view Online Help topics on each section.
Command Button Functionality
Command Button |
Description |
Displays the Client Summary Screen. |
|
Returns the user to the search results screen. |
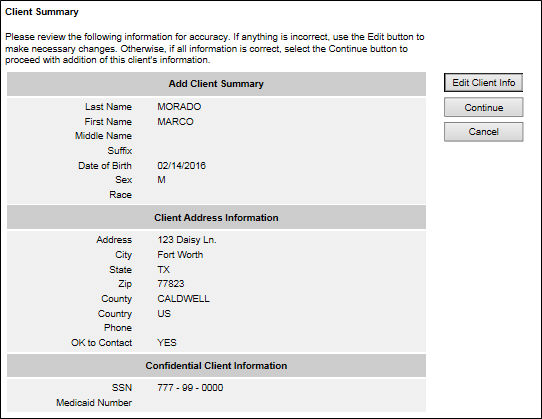
Client Summary Screen |
The Client Summary screen allows the user to review the client information for accuracy. The user can return to the previous screen to make necessary changes or continue to add the client.
Command Button Functionality
Command Button |
Description |
Returns the user to the Add Client screen to update the client information. |
|
Proceeds to the Consent Verification screen or the Potential Match List screen if the system has identified the client as a possible duplicate entry. |
|
Returns the user to the search results screen. |
Potential Match List Screen |
The Potential Match List screen displays when the system determines the client record about to be entered may already exist. The clients that are possible matches to the one you are attempting to enter display in a possible match list. Users can review the immunizations and other information of each possible match. Click the Create New Client button to create a new client record. A pop-up window displays asking the user to confirm they intend to override the system match and create the new client.
NOTE: Clicking the ImmTrac2 ID of that possible match record navigates out of the Client Add process.

Command Button Functionality
Command Button |
Description |
Navigates to the Consent Affirmation screen. |
|
Navigates the user to the application home page without saving. |
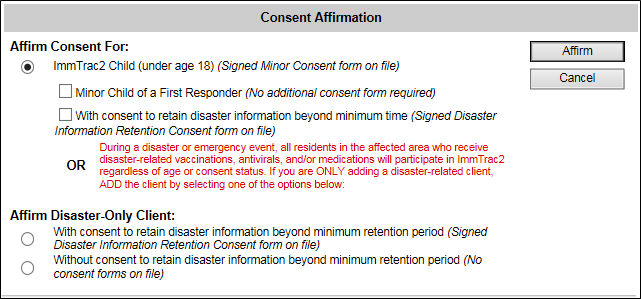
Consent Affirmation Screen |
The Consent Affirmation screen allows the user to verify the client's consent on file by selecting the appropriate radio buttons. On this screen users may also select other types of consent attributes for the client using the check boxes. The consent options that display are based on the client's date of birth, displaying either child or adult consent options.
Command Button Functionality
Command Button |
Description |
Affirms the selected consent options and navigates to Consent Affirmation Confirmation screen. |
|
Returns the user to the search results screen. |
Consent Affirmation Confirmation Screen |
The Consent Affirmation Confirmation screen displays when the new client record has been saved with an assigned ImmTrac2.

Command Button Functionality
Command Button |
Description |
Navigates to the View Client screen. |
|
Returns the user to the Client Search - Smart Search screen with all fields cleared to enter a new client. |
|
Returns the user to the application home page. |
Note
ImmTrac2 is set up to accommodate a variety of user types. Each user will have access to certain features in the application based on the role that is assigned. Online help reflects the capabilities available to provider user roles. Other user roles should refer to the user manual for more access features and capability details.